AVR C++ dev setup with CMake and Conan
Introduction
Setting up a C++ development environment from scratch can be a pain. Here, I’m documenting the steps for installing all the necessary tools for building code for AVR microcontrollers. Together with a template project on GitHub, it should provide a good starting point. At least until the inevitable changes to the tools make this procedure obsolete…
Here is the premise:
- start with a fresh Ubuntu machine (Xubuntu 22.04 used in this example)
- use CMake for building
- use Conan 2 for dependency management
- build from the command line
- [optionally] use VSCode as IDE
Tool installation
We start with essential build tools and some additional utilities.
sudo apt install build-essential cmake clang-format git avrdude
The template project referenced later uses CMake presets, which require CMake version 3.23 or later. On my system, the version installed via apt install was 3.22, which meant I had to install CMake manually. If cmake --version shows 3.23 or later, this is not necessary. Otherwise, either look for a 3rd party binary package or download the latest source from https://cmake.org/download and build using the commands below.
# install build-time dependency
sudo apt install libssl-dev

# unpack the source code, build, and install
tar xf cmake*tar.gz
cd cmake-3.27.7
./bootstrap --parallel=8
gmake -j8
sudo make install
hash -r

# verify
cmake --version
Next, we need the AVR GCC compilers. Download the latest one from https://www.microchip.com/en-us/tools-resources/develop/microchip-studio/gcc-compilers. In this example, I’m installing them in /opt, but any directory will work, including home. Just make sure to use the actual path later on.
sudo tar -C /opt -xf ~/Downloads/avr8-gnu-toolchain-3.7.0.1796-linux.any.x86_64.tar.gz
sudo chown -R root:root /opt/avr8-gnu-toolchain-linux_x86_64
If this is the first time installing git, we need to create the initial configuration. Set up the default branch name, username, and email.
git config --global init.defaultBranch main
git config --global user.name MyUserName
git config --global user.email someemail@somewhere.com
For dependency management, we’re using Conan 2. The first installation method listed on the website (pip install conan) will not work on many modern systems, with Python environments marked as “externally managed”. In those cases, we can use pipx utility.
sudo apt install python3-pip python3-venv
python3 -m pip install --user pipx
python3 -m pipx ensurepath

# restart the console

pipx install conan
Conan profiles
Since we’re using Conan for dependency management, we need to set up Conan profiles. In this example, we’ll make 4 of them: debug and release for the host machine, and 2 profiles for different AVR devices.
First, the two host profiles, named linux-debug and linux-release. We’ll rely on Conan’s automatic setting detection to create the basic profile, duplicate it, and change the build type. The only difference between the two will be the build type setting (debug vs release). We will also link one of them as the default profile.
conan profile detect
cd ~/.conan2/profiles/
mv default linux-release
sed s'/Release/Debug/' linux-release >linux-debug
ln -s linux-debug default
In my case, the files look like this:
linux-release
[settings]
arch=x86_64
build_type=Release
compiler=gcc
compiler.cppstd=20
compiler.libcxx=libstdc++11
compiler.version=12
os=Linux
linux-debug
[settings]
arch=x86_64
build_type=Debug
compiler=gcc
compiler.cppstd=20
compiler.libcxx=libstdc++11
compiler.version=12
os=Linux
If you’d like to use a different compiler, you can provide the path and options here. Remember that this is the for the host-side build, not the AVR cross-compilation.
See Conan docs for full configuration reference, and see the cross-compilation profiles below for examples of specifying the toolchain path.
Next, we create two profiles for AVR devices. In this example, it’s ATMega 2560 (used in Arduino Mega) and ATMega 328 (used in Arduino Nano). Here, we point to the cross-compiler toolchain installed earlier.
[settings]
arch=avr
build_type=Release
compiler=gcc
compiler.cppstd=gnu17
compiler.libcxx=libstdc++11
compiler.version=7
os=baremetal

[conf]
tools.build:cflags=["-mmcu=atmega2560"]
tools.build:cxxflags=["-mmcu=atmega2560"]

[buildenv]
CHOST=avr
CONAN_CMAKE_FIND_ROOT=/opt/avr8-gnu-toolchain-linux_x86_64
AR=/opt/avr8-gnu-toolchain-linux_x86_64/bin/avr-ar
AS=/opt/avr8-gnu-toolchain-linux_x86_64/bin/avr-as
RANLIB=/opt/avr8-gnu-toolchain-linux_x86_64/bin/avr-ranlib
CC=/opt/avr8-gnu-toolchain-linux_x86_64/bin/avr-gcc
CXX=/opt/avr8-gnu-toolchain-linux_x86_64/bin/avr-g++
STRIP=/opt/avr8-gnu-toolchain-linux_x86_64/bin/avr-strip
The only difference in the profile for ATMega 328 is the compiler flags section:
[conf]
tools.build:cflags=["-mmcu=atmega328"]
tools.build:cxxflags=["-mmcu=atmega328"]
This completes the environment setup.
Template project
With the above setup done, we can start by cloning a template repository and using it as a starting point for every new project.
mkdir ~/projects
cd ~/projects
git clone https://github.com/marcinb64/template-avr.git led_blinker
cd led_blinker
We follow the build instructions from the included README file. First, use Conan to create CMake build presets and install any dependencies. The template project has only one dependency: Catch2, and it’s only used for unit tests, so it’s defined conditionally in conanfile.py.
    def requirements(self):
        if (self.options.platform == 'linux'):
            self.requires("catch2/3.1.0")
Other dependencies can be added to the above method by adding more self.requires("name/ver") lines. You can search for packages at https://conan.io/center.
The first-time build consists of 4 main steps. Subsequent builds need only the last command unless the build cache is removed.
conan install conanfile.py --build=missing -pr:h=avr-mega2560
source build/Release/generators/conanbuild.sh   # Load cross-compile config
cmake --preset conan-avr-release -DF_CPU=16000000
cmake --build build/Release
Breaking down the above sequence, we have:
conan install
Installs dependencies (either pre-built or building from source) usingavr-mega2560host profile. It also generates CMake presets and some utility scripts, includingconanbuild.sh.source build/Release/generators/conanbuild.sh
This script loads the build environment, selecting the cross-compilers specified by the Conan profiles we prepared earlier. It is important to remember this step when configuring the project for the first time (or after deleting the build directory). If CMake ever complains about the wrong compiler, it’s likely that the build environment wasn’t loaded properly. In that case, it’s best to deleteCMakeCache.txtfile, re-launch the terminal (to make sure we’re starting with a clean environment), and repeat the procedure.cmake --preset conan-avr-release -DF_CPU=16000000
Configures the CMake build. using the preset generated in the first step. We also pass aF_CPUvariable that defines the CPU frequency (16MHz for Arduino Mega).cmake --build build/Release
Builds all targets.
Note that after the initial configuration, until the build directory (or CMake cache) is removed, you don’t have to source conanbuild.sh each time. Even after restarting the terminal, the build command should work properly using settings cached during this preparation.
This also means, that in this terminal, the environment is still configured for an AVR build. So for the next step, where we’re building unit tests, either deactivate it (using source build/Release/generators/deactivate_conanbuild.sh), or simply open a new terminal.
To build unit tests, we follow similar steps, using one of the Linux profiles, and limiting the build to the test targets.
conan install conanfile.py --build=missing --profile=linux-debug -o platform=linux
source build/Debug/generators/conanbuild.sh
cmake --preset conan-linux-debug -DENABLE_UTEST=On -DENABLE_SANITIZERS=On
cmake --build build/Debug --target utest_core --target utest_somelib
Sourcing conanbuild.sh is only needed if you’re using compilers other than the default ones. In other words, only if linux-debug profile specifies a custom compiler path.
Flashing
The build outputs a binary file that needs to be converted to hex format before it can be loaded to the microcontroller. For that, we use avr-objcopy from the cross-compiler toolchain. Then, we pass the hex file to the avrdude program. To automate this process, we can create a simple script.
#!/bin/sh

OBJCOPY=/opt/avr8-gnu-toolchain-linux_x86_64/bin/avr-objcopy

hexfile="${1}.hex"

${OBJCOPY} "$1" -O ihex ${hexfile}
avrdude -c stk500v2 -p m2560 -P /dev/ttyACM0 -D -U flash:w:${hexfile}
We save the script as ~/.local/bin/flash-arduino-mega and set the executable permissions. Finally, we can flash the device.
chmod 755 ~/.local/bin/flash-arduino-mega
flash-ardunio-mega build/Release/app/sandbox
VSCode [optional]
Recently, I’ve been using VSCode for C++ development. Of course, any other editor and IDE will work as well since the projects can always be built from the command line.
Download the package from https://code.visualstudio.com and install it.
sudo dpkg -i code_1.82.2-1694671812_amd64.deb
Recommended plugins:
- C/C++ Extension Pack
- Clang-Format
Open the project folder in VSCode, but only after running the command-line CMake configure command. This is because we want to use the cross-compiler paths saved in the CMake cache.
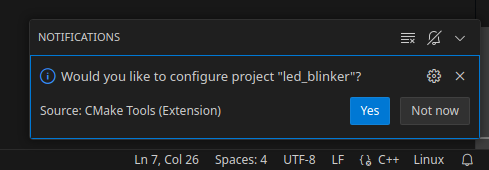
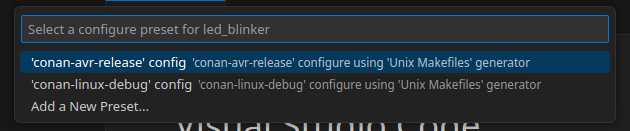
When opening the project for the first time, VSCode will detect a CMake project and allow us to choose a configuration preset. We pick conan-avr-release to work on the production code, with all the AVR libraries visible to the IDE. For working with unit tests, we switch the preset to conan-avr-debug.
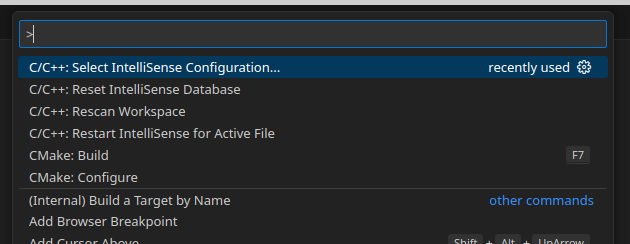
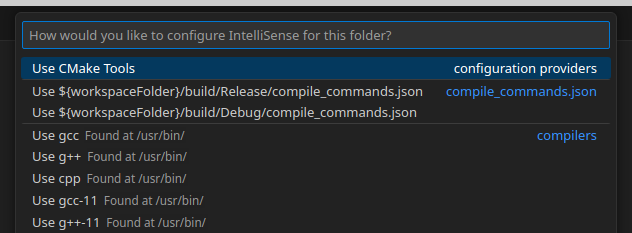
For Intellisense configuration, we select CMake Tools as the provider.
Now the IDE should recognize all the AVR system libraries and we can build the project. And after switching to the debug preset, we should be able to build and run unit tests from VSCode.
Link to the template project on GitHub: https://github.com/marcinb64/template-avr